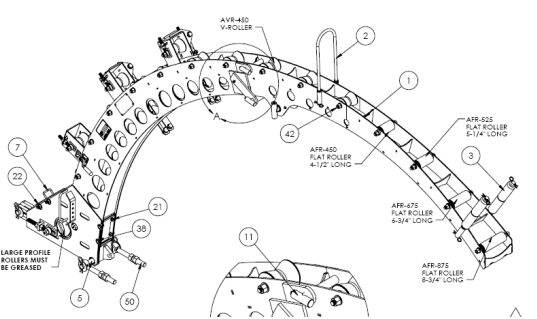
Proper arch alignment is a constant factor in tubulars and injector wear and performance. The tubing can be misaligned on two planes relative to wellbore and within the injector central path: towards and away from wellbore center (front to back); left and right of reel center (side to side).
Initial setup of the arch is the first step to ensuring safe and efficient operation of the injector. Periodic checking of the arch alignment will reduce wear on the tubing and injector components throughout operations. Regular inspection of the tubing will provide visual feedback of misalignment.
The following steps outline the recommended method to ensure and maintain arch alignment.
Install Arch into Cage, without A-Frame and ensure there is room left for adjustment on the 2 front Rod-eyes at the base of the Arch.
Loosely center Arch over the gripper blocks
Insert a straight section of tubing, at least the length of the injector, into the injector to help with alignment.
With the rear guide roller backed off all the way, adjust the arch so that the tubing is just touching the front guide roller or just off of it by no more than a ¼”.
Lock the nuts on the main eyebolt adjustment to hold the arch from moving front to back.
Slide the rear roller ahead so that it is touching the tubing and lock the nuts to hold the roller in place.
At this point remove test pipe and stab coil through injector. Ensure all adjustment eyelets are retracted so that they do not make contact with the pipe when fold overs are activated after tubing install.
Now that the arch is set run the injector in hole to check for marking on the tubing and watch weight to make sure it is not acting like you are snubbing (negative weight). If marks are on the bottom side arch needs to move to move forward and if it is marking consistently on the top the arch needs to be moved back.
If a negative weight is being read the arch needs to be moved up or down to straighten out lead in angle.
You will need to make fine adjustments to the course adjustment and the guide roller adjustment in order to have proper alignment all marks on pipe are indicators of what needs to be adjusted.
After every adjustment the injector will need to be run in hole and out hole to verify that the arch is set correctly and not marking the tubing or giving you a false weight reading.
When all adjustments are completed and all marking has stopped adjust fold over roller to sit approx. 1/8” off of the pipe at no time should this roller be loaded if it does become loaded a realignment will have to be done.
After Arch is aligned, follow A-Frame Installation procedure and levelling.
Have questions about our downhole tools? We can help.
Coil Solutions is an industry leader and innovator in coil tubing solutions and downhole tools. We are proud to be on the leading edge of change in next generation technology for enhanced oil recovery.